How do I prepare 1099s for my Contractors?
First, you will need to make sure that the 1099 option is enabled in your version of QuickBooks:
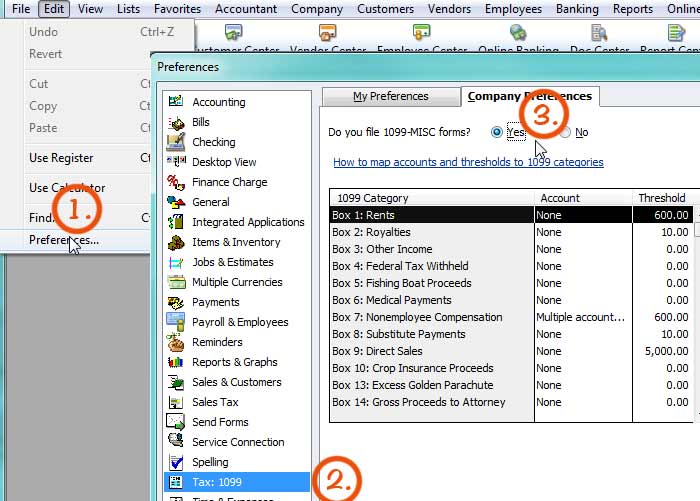
1. Click on Edit, then Preferences.
2. In the Preferences window, click Tax: 1099 toward the bottom of the list on the left.
3. Click on the Company Preferences tab. And select YES under the question, "Do you file 1099 MISC forms?"
Next, make sure that your independent contractors are properly set up as 1099 recipients:
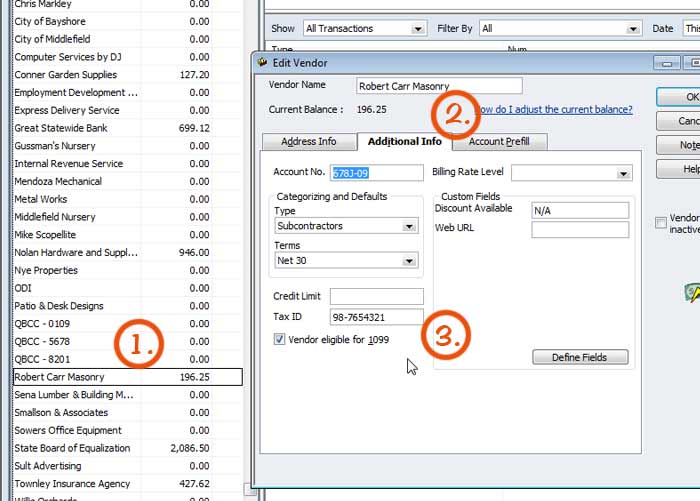
1. In the Vendor List, either Right-Click on the subcontractor's name or go to the button at the top right side of the screen, and click Edit Vendor.
2. Click on the Additional Info tab.
3. Mark the checkbox that says "Vendor eligible for 1099" and then be sure to fill in the vendor's Social Security Number, or Tax ID Number. Do this for every eligible vendor.
Then, you can open the 1099 and 1096 Wizard and follow the steps as shown:
Click on Vendors, then click on Print 1099s/1096...
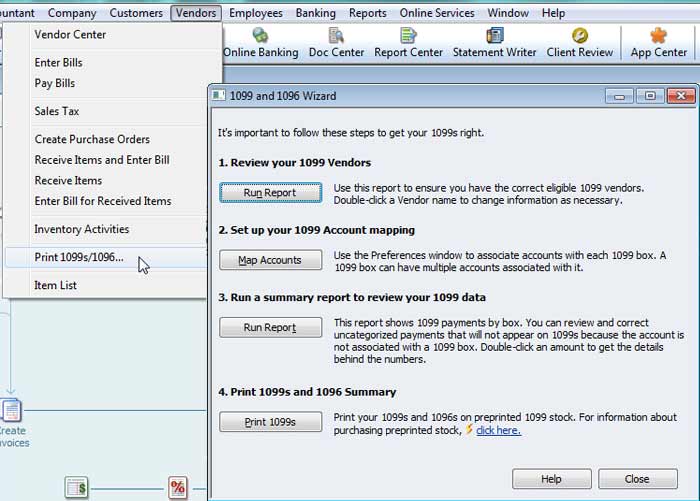
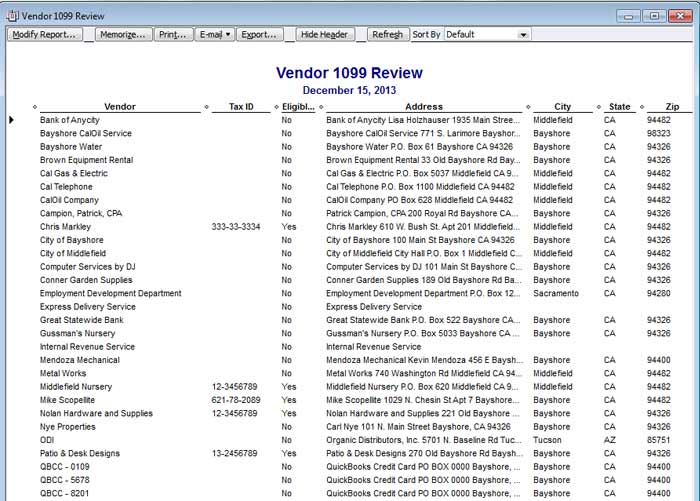
The first button is Run Report, which produces the Vendor 1099 Review (shown below):
This report allows you to review all of your vendors, make sure that the 1099 recipients are shown as eligible, and that their Tax ID Numbers and addresses are correct.
The next step in the Wizard is to Map your Accounts:
1. Go back to Edit > Preferences > Tax: 1099, and again select the Company Preferences tab.
2. Click on the Account area for Box 7:Nonemployee Compensation, and pull down the arrow for Multiple Accounts..
3. Click on Multiple accounts... Then select ALL of the accounts you have used to classify payments to Independent Contractors, such as Contract Labor, Subcontractors, Delivery Fees, Professional Fees, and any other accounts you may be using.

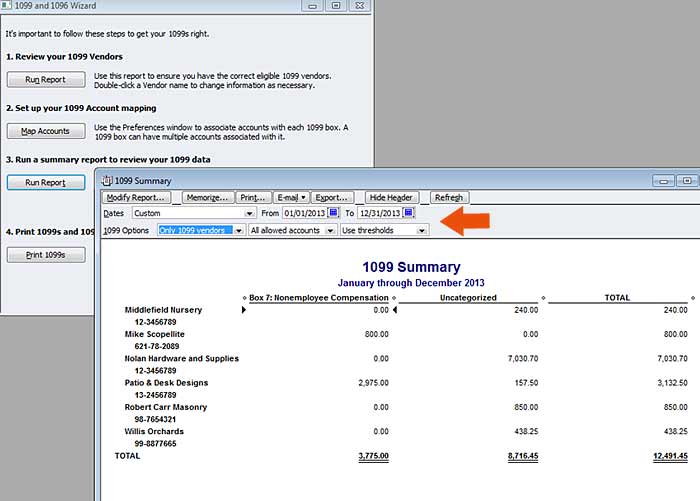
The third step in the Wizard is another Run Report button. This one produces a 1099 Summary (shown below):
If it is not already entered, make sure that the current year from January 1 through December 31 is shown, and select the other 1099 Options, such as "Only 1099 vendors," "All allowed accounts," and "Use thresholds." This report allows you to review all of your vendors, make sure that the 1099 recipients are shown as eligible, and that their Tax ID Numbers and addresses are correct. Everything shown in the column for Box 7 will print on the 1099s.
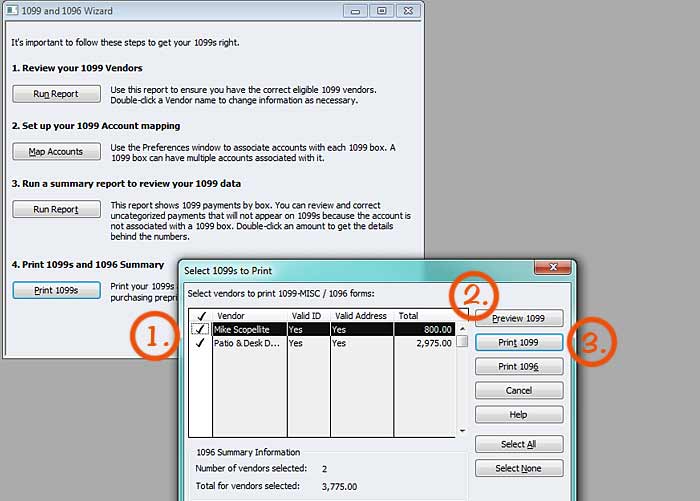
The fourth and almost final step in the Wizard is Print 1099s. You will still have as many opportunities as you need to review and revise your information before finally printing on the actual forms.
1. By default, all of your independent contractors who earned over the current 1099 limit of $600, will be selected. Normally you would accept all of the selected vendors. However, this is where you can go back and reprint selected 1099s if some of them do not print correctly. In that event, simply select only the ones that misprinted, and you can re-print just those vendors.
2. You can select the "Preview 1099" button to see exactly how your 1099s will look. Print this previewed report on plain paper to see if the data will line up with your pre-printed forms. You may have to position the forms all the way over to the right or left side of your printer paper tray and guide each one with your hands as they go through the printer (because the 1099s are not a full 8 1/2-inch width).
3. Once you are satisfied that they will print correctly, SEPARATE as many 1099-MISC forms as you will be using. QuickBooks will print all of the 1099s, but it will NOT collate them. All of the Copy C forms should be placed in the paper tray, then click Print 1099, and print one copy. Repeat this step for Copies B and A. Separate copies B and C (or whichever copies your State requires) and distribute to your vendors. As is printed on COPY A - "Do Not Cut or Separate Forms on This Page." All Copies A must be submitted in tact to the IRS along with Form 1096.
Finally, in the Wizard, select the Print 1096 button and print your 1096 Summary, making sure that the totals printed agree with the total of your 1099s. Then, mail in the 1096 and all Copy A 1099s to the IRS address listed on the 1096.